
Peach cobbler cheesecake is the ultimate summer cheesecake! It's full of flavor and texture thanks to SEVEN layers of graham cracker crust and alternating layers of creamy cheesecake filling, roasted peaches, and streusel.

what is peach cobbler cheesecake?
Whoever invented peach cobbler cheesecake deserves a round of applause. I'm not exactly sure who the original creator is, but this is my recipe (inspired by Blue Bowl Recipes and Butternut Bakery's versions)!
We're using my favorite graham cracker crust and base cheesecake batter from my classic cheesecake recipe. The cheesecake filling is layered with sweet roasted peaches and crispy streusel. After baking and chilling, it's topped with even MORE roasted peaches and streusel for the ultimate summer cheesecake! It packs all the flavors and textures of a cheesecake AND peach cobbler in one.

how to roast peaches for cheesecake
So this cheesecake has 2 peach layers and both are roasted beforehand to soften them and to really bring out their deliciously sweet flavor. One of the layers is roasted, cooled, and then baked with the cheesecake for a little swirled line running through the center of each slice. The second layer is roasted and cooled then used as a topping for the chilled cheesecake. You could roasted both layers all at once, but I personally prefer to roast them individually for 2 reasons:
- I like to slice and roast the 2 layers slightly differently - I prefer to slice the layer of peaches that run through the center of the cheesecake a little thinner than the peaches on top. Thinner peaches in the center just blend more nicely with the slice of cheesecake while thicker slices on top are prettier in my opinion. I also like to leave the top decorative peaches a bit firmer just because I like the different textures and prefer the appearance of slightly under-roasted peaches on top. This is 100% a personal preference though and won't really impact much else in the recipe.
- The top decorative peaches will lose their plump appearance as they sit - Again, purely decorative and purely a personal preference. But if you make the roasted peaches meant for the top of the cheesecake early on, they'll lose their fresh look as they sit. If you don't mind the appearance, it's totally fine to roast the peaches all at once.

But now onto how to actually roast peaches! It's such a simple and easy process but makes for an extra delicious bite of peaches.
- Add peaches, sugar, and cinnamon onto a parchment lined baking sheet.
- Toss together until the sugar granules are all stuck onto the peaches.
- Let sit for up to 5 minutes - just until the peaches start to look shiny and some of the sugar has dissolved.
- Roast at 400°F or until fork tender. The higher temperature allows the peaches to soften without losing their shape.
You can roast the peaches a little longer for extra soft pieces or roast for a shorter time for peaches that have more of a bite to them. Although the center swirl of peaches will be baked with the cheesecake, they won't really continue to soften - so the final softness of the roasted peaches is almost exactly the texture you should expect out of the baked cheesecake.
Regardless of how long you choose to roast them, it's important to avoid excessively over-roasting them (which may make the center mushy) or excessively under-roasting them (which can shred your cheesecake filling come time to slice).

how to make peach cobbler cheesecake
1. Toss together peach filling ingredients and roast. Set aside to cool.
2. Mix together streusel ingredients and bake. Flour can contain harmful bacteria, so any recipe containing flour should always be baked before consuming. Baking the streusel makes it safe to use half of it as a topping after the cheesecake has baked and makes the streusel we add to the center of the cheesecake a bit crispier!


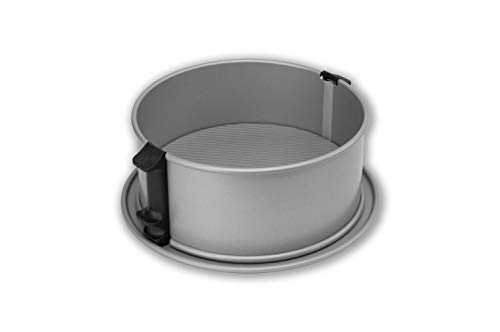
3. Mix together graham cracker crust ingredients and pack into a springform pan. Bake the crust and set aside to cool slightly.


4. Make the cheesecake filling. Cream together cheese and sugar until smooth, then whisk in remaining ingredients (minus the eggs). Whisk the eggs in, one at a time, mixing just until the egg disappears before adding in the next egg. That's all there is to making cheesecake batter!


5. Layer and bake. Pour about half of your cheesecake filling over the slightly cooled crust. Arrange an even layer of roasted peaches followed by a sprinkling of some of the streusel. Pour over the remaining cheesecake batter and bake. Cool the baked cheesecake completely to room temperature then chill in the fridge until firm.


6. Roast the remaining peaches for the topping. Cool them completely to room temperature before layering on top of your chilled cheesecake. Sprinkle over the remaining streusel then dig in!


peach cobbler cheesecake tips
- room temperature - The temperature of your ingredients are important to ensuring the cheesecake whips up smoothly and bakes up with a crack free top. When it comes to the roasted peaches, streusel, and graham cracker crust, it's OK if they're a little warm when they're layered with the filling - just make sure they're not hot and are easy to handle by hand.
- mixing - Avoid overmixing the cheesecake batter. This can cause air bubbles to form which will pop as they bake and cause cracks on the surface. The nice thing about this cheesecake is it's easy to hide cracks with the peach topping, but overmixing is added work and what's the point of that??
- water bath - Cheesecake is almost always baked with a water bath - the steamy environment helps prevent drying out and will give the cheesecake a beautifully creamy texture! You can use a traditional water bath (where the cheesecake pan is placed in a larger pan filled with water) or a kind of cheat version (where a pan of boiling water is placed on the rack beneath the cheesecake). Either option works fine!
- cooling - The worst part about homemade cheesecake. Waiting. It needs a few hours to chill enough to give you clean slices and that classically dense texture.
- cooling pt. 2 - Still on the topic of cooling! About 30 minutes after the cheesecake has finished baking, go in with a sharp pairing knife and run it along the edges between the cheesecake and the pan to loosen any stuck on portions. As it cools, cheesecake shrinks. If any pieces of the cheesecake are stuck to the pan when it begins to shrink, it'll start tearing and ripping the sides off, which (again) creates cracks.
- slicing - Use a sharp knife to cut the cheesecake to give you the cleanest possible slices. It needs to go through several layers, each with their own unique texture. So a sharper knife does an infinitely better job than a dull one!

storage
Keep cheesecake stored in the fridge until right before you plan on serving it. This cheesecake will keep for about 3 to 4 days. The peach topping will continue to soften as it sits, so if you want it looking extra fresh come serving time, avoid roasting it until you're just about ready to enjoy.
check out these other recipes!
Lastly, if you made this or any of my recipes, be sure to leave a comment and review below! I love hearing your thoughts! Also tag me on Instagram @eatsdelightfulblog so I can see what you're making.
Print
Peach Cobbler Cheesecake
- Total Time: 8 hours 10 minutes
- Yield: 1 cheesecake
Description
Peach cobbler cheesecake is the ultimate summer cheesecake! It's full of flavor and texture thanks to SEVEN layers of graham cracker crust and alternating layers of creamy cheesecake filling, roasted peaches, and streusel.
Ingredients
For the peach filling*:
- 4 medium peaches, slightly underripe
- 3 tablespoons granulated sugar
- ½ teaspoon ground cinnamon
For the crumby streusel:
- 1 & ¼ (150g) cups all-purpose flour, spoon and leveled
- 1 cup (200g) packed brown sugar, light or dark
- 1 teaspoon ground cinnamon
- ½ cup (115g) unsalted butter, melted and cooled
For the graham cracker crust:
- 2 cups (210g) graham cracker crumbs
- 2 tablespoons granulated sugar
- 1 teaspoon ground cinnamon
- ½ cup (115g) unsalted butter, melted and cooled
For the cheesecake filling:
- 4 (8oz) blocks cream cheese (32oz / 900g total), at room temperature
- 1 cup (200g) granulated sugar
- ½ teaspoon salt
- ¼ cup (30g) all-purpose flour, spooned and leveled
- ½ cup (120g) sour cream, at room temperature
- 2 teaspoons pure vanilla extract
- 4 large eggs, at room temperature**
For the peach topping:
- 5 medium peaches, slightly underripe
- 4 tablespoons granulated sugar
- ½ teaspoon ground cinnamon
Instructions
*Note: You can combine the peach filling and the peach topping and roast them all at once. I personally prefer to roast the topping separately because a) I like to slice the peaches a bit thicker and slightly under roast them and b) they look more fresh if you roast them the day you plan on serving the cheesecake. This is 100% a personal preference and is just for appearances. Otherwise, you can definitely roast all the peaches at the same time. Keep the peaches for the topping stored in the fridge until ready to decorate.
Make the peach filling:
- Position 2 oven racks: one in the center and one on the lowest position in your oven (this is for the cheesecake later). Preheat your oven to 400°F. Line a large baking sheet with parchment paper.
- Core the peaches and slice into roughly ⅛ to ¼ inch thick wedges.
- Drop the sliced peaches onto your parchment lined baking sheet and sprinkle over sugar and cinnamon.
- Toss together until the sugar granules have stuck onto the peaches then spread into an even layer. Let sit for about 5 minutes. You're looking for the peaches to start releasing water, making them appear shiny, and for the sugar to partially dissolve.
- Roast the peaches in the center of your preheated 400°F oven for 10 to 15 minutes or until fork tender.
- Set aside to cool on the baking sheet.
Make the streusel:
- Reduce the heat of your oven to 325°F (the rest of the cheesecake components will be baked on this temperature). Line another large baking sheet with parchment paper.
- We're going to bake the streusel to make it safe to use as a topping for the cheesecake later. This also helps make the streusel we add to the center of the cheesecake crispier!
- In a medium sized bowl, combine streusel ingredients. Mix together until well combined and the mixture resembles wet sand.
- Sprinkle onto your parchment lined baking sheet and spread into an even layer.
- Bake the streusel in the center of your 325°F oven for 10 minutes.
- Cool for 5 to 10 minutes on the baking sheet (or until it's safe for you to handle) then use your fingers to break up any large clumps to create a relatively even crumble (a few smaller or larger pieces are fine). Set aside.
Make the graham cracker crust:
- In a medium bowl, mix together graham cracker crust ingredients to combine.
- Pour the crust into a 9 inch springform pan. Use the bottom of a cup or ramekin to firmly pack the crust into the bottom and about ½ way up the sides of your pan.
- Bake the crust in the center of your preheated 325°F oven for 8 minutes. The crust won't look very different, but this helps keep it crispy.
- Set aside to cool slightly while you prep the cheesecake batter (but keep the oven preheated to 325°F).
Make the cheesecake batter:
- In a large bowl, combine cream cheese and sugar. Use a mixer fitted with the paddle attachment or a wooden spoon by hand to cream together until combined and lump free. This will take about 2 minutes by hand or 1 minute with a mixer set to medium speed.
- Add salt, flour, sour cream, and vanilla. Mix to combine.
- Add the eggs into the cream cheese mixture one at a time, mixing until the egg just disappears into the batter before adding the next egg. Take care not to overmix! I recommend doing this step by hand with a whisk to avoid overmixing, but if you want to use a mixer, keep it at low speed.
- Now it's time to layer! Pour about half of the cheesecake batter into your 9 inch springform pan over your slightly cooled graham cracker crust (it's ok if it's still a little warm!) Spread into an even layer.
- Layer all of the cooled roasted peaches evenly over the surface of the cheesecake batter then sprinkle about ⅓ to ½ of the streusel on top. Set aside the remaining streusel in the fridge for topping later.
- Dollop the remaining cheesecake batter on top, taking care not to disturb the filling too much, and smoothen the top batter into an even layer.
- Fill a large baking pan with about 1 inch of boiling water then carefully place the pan on the bottom rack of your oven. Place the cheesecake on the center rack of the oven above the water filled pan.
- Bake the cheesecake in your preheated 325°F oven for 1 hour 10 minutes to 1 hour 20 minutes. The surface of the cheesecake should be puffed and the edges just slightly browned. If you gently shake the pan, the center of the cheesecake should be jiggly but the edges should remain firm.
- Turn the oven off and crack the door open slightly. Cool the cheesecake for about 1 hour with the oven door slightly ajar. After about 30 minutes, I recommend going in and running a sharp pairing knife around the edges of the cheesecake to loosen any portions that may be stuck onto the sides of the pan. This helps prevent breakage as the cheesecake cools and shrinks (if the sides are stuck, they can rip and tear).
- After the cheesecake has cooled in the oven, take it out and allow it to cool completely to room temperature. Cover and chill the cheesecake for at least 4 hours or overnight or until fully firmed up and set.
Make the peach topping:
- Preheat your oven to 400°F. Line a large baking sheet with parchment paper and set aside.
- We're going to be repeating the same steps we did for the peach filling at the beginning of the recipe.
- Core the peaches and slice into roughly ¼ to ½ inch thick wedges. I like thicker peach slices for the topping, but if you prefer, you can slice them thinner. Just keep in mind thinner slices will bake faster.
- Drop the peach slices onto your baking sheet and sprinkle over sugar and cinnamon.
- Toss together until the sugar has stuck onto the peaches then spread into an even layer on your baking sheet. Allow the peaches to sit for about 5 minutes or until they appear shiny on the surface.
- Bake the peaches in the center of your preheated 400°F oven for 12 to 16 minutes (for thicker slices) or until fork tender.
- Cool completely on the baking sheet.
- Once the peaches have cooled, unlatch your springform pan and transfer the chilled cheesecake to a serving plate or cake stand. Top the cheesecake with the peaches and any juices in the pan then sprinkle over the reserved streusel on top.
- Slice with a sharp knife and serve!

Notes
** To bring eggs up to room temperature in a flash, you can submerge them in a bowl of warm water for about 5-10 minutes. Just watch out for eggs that may have deep cracks in the shell because the water can seep in.
- Prep Time: 40 minutes
- Bake Time: 1 hour 45 minutes
- Category: Cheesecakes
- Method: Baking
Enjoy!


Add a Comment